It's been a pleasant time all these years blogging and interacting with friends who share common interest with me. You've probably noticed that my blog posts are coming in lesser and less timely. I'm still cooking, baking and learning new recipes, but just getting lazy to organise it and pen it down. With me getting active in Facebook, I've been posting all my pictures and comments there. Facebook allows high and sometimes, almost instant interactions, which I very much enjoy. It doesn't make much sense to copy everything from there into here again, just for the sake of blogging. So I've decided to stop my blogging activity for now.
If you wish to continue following my baking & cooking journey, here are the Facebook albums you can look at.
From My Kitchen 2011
Food Fun
I'll continue my little journey there. Take care and hope to see you soon. :)
20 April 2011
22 February 2011
Lost my way
I seem to have lost my way in the world of blogging. I'm still baking, just not blogging. Have been so busy with day-to-day chores since school term starts this year that I hardly had any mood to blog. I was reminded of my dear blog when one of my friends told me she had tried out some recipe from the blog and love it.
The last Chinese New Year has been hectic. Endless baking of pineapple tarts as gifts, to the point that I almost dread doing it. As such, I have not even tried a new pineapple tart recipe which I was supposed to after CNY. I guess the mood to bake CNY goodies is just not there once the festive season is over. The remaining pineapple jam is still sitting in a corner in my fridge and will probably sit there for a while longer.
Ever since 3 years ago, it has become a habit to do the Poon Choy (盆菜) for my mum every CNY. As age catches up with her, she can no longer rush through the preparation of multiple dishes for our yearly reunion affair. In the recent years, we no longer go back for reunion on the eve, but change it to the second day of the lunar new year instead. I will bring the Poon Choy over to her before the eve so that she can have a mini reunion dinner with my dad and brother on the eve. Hopefully that lightens her burden a little so that she does not need to prepare too much food.

Besides the CNY goodies and Poon Choy, I have one additional task every CNY, to bake my girl's birthday cake. Her birthday always coincide with the CNY, which explains why I am exceptionally busy during this period.
This year, she wanted a Castle cake. Although my girl is already 7, she has not outgrown from her princess dreams. Last year she had a Barbie doll cake and now, another Fairytale request. My first fondant cake was also a castle cake, for her 4th birthday. How time flies!

I didn't really do a good job for this one. Tried a new recipe and the cake turned out unsatisfactory. It was dry and flat. I never seem to learn my lesson. I keep forgetting not to use new recipe for big projects like this. I ended up having to bake another cake to have that required height. Sigh......

As usual, the decoration took me almost 14 hours to complete. Only managed to sleep for an hour as I needed to wake the kids up for school. Although I had drafted a plan before starting, my end product deviated much from the plan. What's new, right?

This year I used some fondant pattern sheets for the wall and towers. But the effect didn't turn out that prominent. I suspect it was because my fondant was rolled too thin. It didn't help to have a cool weather that day. The fondant was sweating and couldn't hold the design well. Part of the design was thinned till the cake could be seen! Next time I must remember to use a thicker layer to cover the cake.

I wanted to create a garden effect for the castle, but didn't do great for that. It still had that empty look.

I had fun doing the flowers and leaves though. They were easy to make and add a bit of color to the otherwise, plain castle.


My girl was happy with her cake. So I guess it has made all the sleepless night worthwhile. But I was so tired that I practically knocked out at my in law's after reunion dinner.
With the festive season over, we're left with lots of Mandarin Oranges. I had to use some for baking. Choose to make a chiffon cake since I haven't done one for ages.

The cake was moist, but the Mandarin Oranges were not really prominent though you can taste bits of them. Perhaps next round I should use the tangy ones to get a better effect.

Mandarin Orange Chiffon
Ingredients
5 egg yolks
30g sugar
1/2 tsp salt
50g corn oil
130g Mandarin orange pulp (can include a bit of juice)
Sift together
120g cake flour
1.5 tsp baking powder
5 egg whites
50g sugar
Method
1. Cream egg yolk and sugar with a hand whisk until sugar dissolve. Add salt and mix well.
2. Add corn oil. Mix well.
3. Add Mandarin orange pulps. Mix well.
4. Fold in sifted flour mixture with a hand whisk.
5. In a clean bowl, beat egg white till soft peak. Add in sugar in 2 additions and beat till stiff peak.
6. Add 1/3 of the egg white into the yolk mixture to loosen it.
7. Fold in the remaining egg white in two rounds until well incorporated.
8. Pour into 21cm tube pan. Knock pan on table top to remove trapped bubbles.
9. Bake at 170C for 45-55 mins. Tent top if it gets too brown.
10. Invert cake to cool once out of the oven.
The last Chinese New Year has been hectic. Endless baking of pineapple tarts as gifts, to the point that I almost dread doing it. As such, I have not even tried a new pineapple tart recipe which I was supposed to after CNY. I guess the mood to bake CNY goodies is just not there once the festive season is over. The remaining pineapple jam is still sitting in a corner in my fridge and will probably sit there for a while longer.
Ever since 3 years ago, it has become a habit to do the Poon Choy (盆菜) for my mum every CNY. As age catches up with her, she can no longer rush through the preparation of multiple dishes for our yearly reunion affair. In the recent years, we no longer go back for reunion on the eve, but change it to the second day of the lunar new year instead. I will bring the Poon Choy over to her before the eve so that she can have a mini reunion dinner with my dad and brother on the eve. Hopefully that lightens her burden a little so that she does not need to prepare too much food.
Besides the CNY goodies and Poon Choy, I have one additional task every CNY, to bake my girl's birthday cake. Her birthday always coincide with the CNY, which explains why I am exceptionally busy during this period.
This year, she wanted a Castle cake. Although my girl is already 7, she has not outgrown from her princess dreams. Last year she had a Barbie doll cake and now, another Fairytale request. My first fondant cake was also a castle cake, for her 4th birthday. How time flies!
I didn't really do a good job for this one. Tried a new recipe and the cake turned out unsatisfactory. It was dry and flat. I never seem to learn my lesson. I keep forgetting not to use new recipe for big projects like this. I ended up having to bake another cake to have that required height. Sigh......
As usual, the decoration took me almost 14 hours to complete. Only managed to sleep for an hour as I needed to wake the kids up for school. Although I had drafted a plan before starting, my end product deviated much from the plan. What's new, right?
This year I used some fondant pattern sheets for the wall and towers. But the effect didn't turn out that prominent. I suspect it was because my fondant was rolled too thin. It didn't help to have a cool weather that day. The fondant was sweating and couldn't hold the design well. Part of the design was thinned till the cake could be seen! Next time I must remember to use a thicker layer to cover the cake.
I wanted to create a garden effect for the castle, but didn't do great for that. It still had that empty look.
I had fun doing the flowers and leaves though. They were easy to make and add a bit of color to the otherwise, plain castle.
My girl was happy with her cake. So I guess it has made all the sleepless night worthwhile. But I was so tired that I practically knocked out at my in law's after reunion dinner.
With the festive season over, we're left with lots of Mandarin Oranges. I had to use some for baking. Choose to make a chiffon cake since I haven't done one for ages.
The cake was moist, but the Mandarin Oranges were not really prominent though you can taste bits of them. Perhaps next round I should use the tangy ones to get a better effect.
Mandarin Orange Chiffon
Ingredients
5 egg yolks
30g sugar
1/2 tsp salt
50g corn oil
130g Mandarin orange pulp (can include a bit of juice)
Sift together
120g cake flour
1.5 tsp baking powder
5 egg whites
50g sugar
Method
1. Cream egg yolk and sugar with a hand whisk until sugar dissolve. Add salt and mix well.
2. Add corn oil. Mix well.
3. Add Mandarin orange pulps. Mix well.
4. Fold in sifted flour mixture with a hand whisk.
5. In a clean bowl, beat egg white till soft peak. Add in sugar in 2 additions and beat till stiff peak.
6. Add 1/3 of the egg white into the yolk mixture to loosen it.
7. Fold in the remaining egg white in two rounds until well incorporated.
8. Pour into 21cm tube pan. Knock pan on table top to remove trapped bubbles.
9. Bake at 170C for 45-55 mins. Tent top if it gets too brown.
10. Invert cake to cool once out of the oven.
26 January 2011
I'm Bento-ing
I've joined in the community of bento mamas since Olina gets into primary school this year. Because of her long hours in school, I'm afraid she will often be hungry by the time she gets home and develops gastric problem in the long run.
I always go "wah..." over others' creations when I read their bento blogs. It's really an art to create a presentable and yet nutritious bento. And you know, I seriously lack that artistic touch.
Practising my raw bento skills in yesterday lunch


It was tough (and still is) trying to pack a kawaii bento in the wee hours. Being a person who doesn't plan much in advance (maybe that should be my 2011 resolution), I always run out of ideas what to "create" into the lunchboxes. Decorating the items takes time and I often run into the danger of being late. This morning the school bus driver had to ring me to remind that I'm running late. Oops!
This was what I prepared for the kids this morning.
Recess for the kids


Breakfast for the little one

After a few rounds of bento-ing, I discovered I need an average of one and a half hours to work comfortably. That means, I would need to wake up before 5am to prepare a non-elaborate bento!
I'll probably look for a few bento books in my next trip to the library to pick up some tips and ideas. Hopefully that will speed things up a little.
I always go "wah..." over others' creations when I read their bento blogs. It's really an art to create a presentable and yet nutritious bento. And you know, I seriously lack that artistic touch.
Practising my raw bento skills in yesterday lunch
It was tough (and still is) trying to pack a kawaii bento in the wee hours. Being a person who doesn't plan much in advance (maybe that should be my 2011 resolution), I always run out of ideas what to "create" into the lunchboxes. Decorating the items takes time and I often run into the danger of being late. This morning the school bus driver had to ring me to remind that I'm running late. Oops!
This was what I prepared for the kids this morning.
Recess for the kids
Breakfast for the little one
After a few rounds of bento-ing, I discovered I need an average of one and a half hours to work comfortably. That means, I would need to wake up before 5am to prepare a non-elaborate bento!
I'll probably look for a few bento books in my next trip to the library to pick up some tips and ideas. Hopefully that will speed things up a little.
20 January 2011
The search for the perfect Pineapple Tarts
I've been making pineapple tarts for the last 3 years, each year testing different recipes to see if any is THE ONE I'm looking for. Individual preference can vary much for pineapple tarts. Recently, I found that the phrase "melt in the mouth" can also have different meanings, based on individual expectation. Some use it to refer to cookie crisp, but will disintegrate in your mouth, like Kuih Bangkit. For me, I prefer it to be of a powdery texture such that when you just pop the tart into your mouth, it starts to disintegrate. I hope I have not confused you further...lol...
I tried two different recipes this year. The first was from The Little Teochew. I got attracted by her beautiful pictures and the title of her post, "Buttery Melt-in-your-mouth Pastry". It looks like what I may be looking for, since the recipe contains cornflour. I made a mistake by reducing the amount of icing sugar. As such, the pastry tasted quite bland. The recipe uses unsalted butter, which I later find out, does not yield the kind of pastry I like. Because my pineapple jam is tangy, I prefer my pastry to be on the salty side.


Like what Ju mentioned in her post, there are tonnes of recipes out there, what is nice for some may not be others' preference.
So I continued searching and reading up more on pineapple tarts. Someone (I can't recall where I read it from) mentioned that milk powder may yield a more powdery effect. I also learnt that the rubbing-in method which I have been using possibly provides a crisp, melt-in-the-mouth kind of texture. To get a powdery texture, the creaming method (i.e. creaming butter with sugar, like our usual cake) should be used.
Pinkcocoa Tabetai offers a detailed and clear comparison on that.
I decided to try her pastry recipe because she seemed to have a good knowledge of pineapple tarts and her recipe has what I was looking for, cornflour and milk powder. I was even happier when I see custard powder as one of the ingredients. I had a big pack of custard powder sitting in my cupboard and was wondering what I can do with it.

I made a slight change to her recipe though. I replaced the unsalted butter and salt with salted butter. The pastry was super soft and quite difficult to work with. I had to take small portion out of the fridge to work individually. But the result was very encouraging. I tested the tarts straight after they had cooled down. It was powdery and melt-in-the-mouth, as compared to my first attempt. Even hubby said this version was much better. He didn't like the first version of the pastry.

I am so glad that I have finally found the pastry that suits the taste of my family. I will be using this recipe from now onwards. Hope you'll find yours too.
I will be submitting this to the monthly blog event, Aspiring Bakers #3: My Favorite CNY Cookie (Jan 2011). Due to some personal reason, I've missed my submission last month. Hope to make it this round.
I tried two different recipes this year. The first was from The Little Teochew. I got attracted by her beautiful pictures and the title of her post, "Buttery Melt-in-your-mouth Pastry". It looks like what I may be looking for, since the recipe contains cornflour. I made a mistake by reducing the amount of icing sugar. As such, the pastry tasted quite bland. The recipe uses unsalted butter, which I later find out, does not yield the kind of pastry I like. Because my pineapple jam is tangy, I prefer my pastry to be on the salty side.
Like what Ju mentioned in her post, there are tonnes of recipes out there, what is nice for some may not be others' preference.
So I continued searching and reading up more on pineapple tarts. Someone (I can't recall where I read it from) mentioned that milk powder may yield a more powdery effect. I also learnt that the rubbing-in method which I have been using possibly provides a crisp, melt-in-the-mouth kind of texture. To get a powdery texture, the creaming method (i.e. creaming butter with sugar, like our usual cake) should be used.
Pinkcocoa Tabetai offers a detailed and clear comparison on that.
I decided to try her pastry recipe because she seemed to have a good knowledge of pineapple tarts and her recipe has what I was looking for, cornflour and milk powder. I was even happier when I see custard powder as one of the ingredients. I had a big pack of custard powder sitting in my cupboard and was wondering what I can do with it.
I made a slight change to her recipe though. I replaced the unsalted butter and salt with salted butter. The pastry was super soft and quite difficult to work with. I had to take small portion out of the fridge to work individually. But the result was very encouraging. I tested the tarts straight after they had cooled down. It was powdery and melt-in-the-mouth, as compared to my first attempt. Even hubby said this version was much better. He didn't like the first version of the pastry.
I am so glad that I have finally found the pastry that suits the taste of my family. I will be using this recipe from now onwards. Hope you'll find yours too.
I will be submitting this to the monthly blog event, Aspiring Bakers #3: My Favorite CNY Cookie (Jan 2011). Due to some personal reason, I've missed my submission last month. Hope to make it this round.
12 January 2011
Happy 2011!
Time flies! It's already nearly mid of Jan 2011. I've been super busy since school term started last week. Olina entered P1 this year. She's in the morning session and her school bus reaches our place at 6am! I've got to wake up at 5am now, one and a half hour earlier than last year. So I'm now leading a healthy lifestyle of 早睡早起.
I'm still trying to adjust to the new routine. First week was really chaotic. I didn't even have time to watch my favourite K drama. Stepping into the second week, things seems a little better as the momentum picks up. I need to further adjust my routine, as I do not have much time to sit down and supervise the kids on their work. As a result, the two younger ones are still leading a life of school holiday. :) Darren is going to take his PSLE this year. Having a tutor to take care of three of his subjects, no doubt, is a big relief to me. Sometimes we just need to let go and allow others to help.
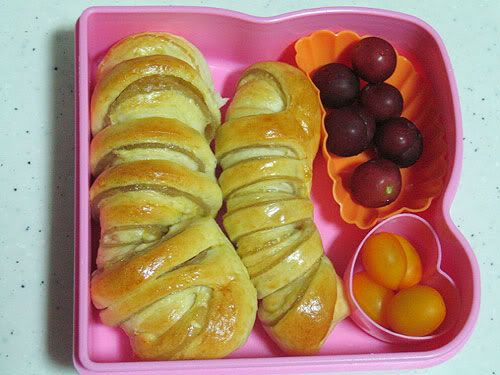
This year, I have to pack lunchboxes for the two primary school kids, especially since Olina will only reach home after 2:30pm. So I reckon I'll probably do baking at least once a week, though I'm not sure if I can find as much time to blog them.
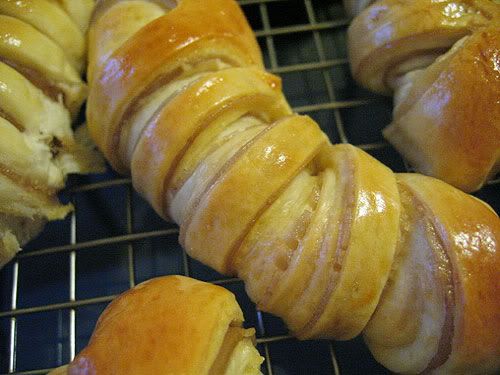
I started 2011 with buns. During the Popular 20% member sales, I went to grab a few cookbooks, one of which was "Bread Magic" by Alan Ooi. This has been one of the books I wanted to add on to my collection. I use the basic sweet bun recipe from this book to make these 莲蓉面包.
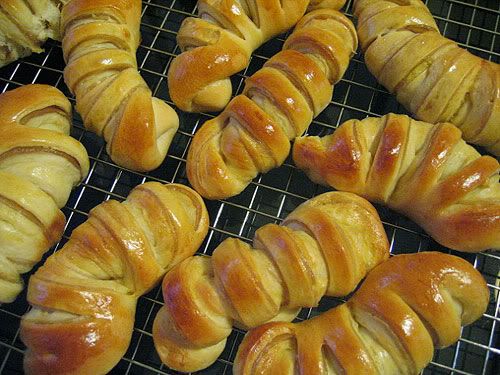
Packed into lunchbox
The texture is ok, but not as fluffy when eaten on the second day. The next time, I'll try his dough recipe.
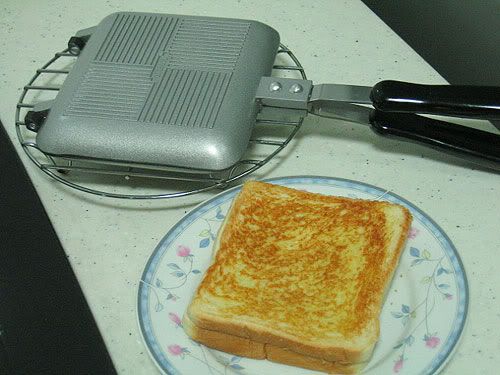
I'm now constantly on the lookout for things which can assist me in my lunchbox journey. Unlike my hubby who thinks that it's ok to let the kids bring butter and jam bread, I try to make the lunchbox varies. Recently I found a sandwich maker from Isetan NEX which can be used on the stove. It's a perfect choice for me. I used to have one electrical sandwich maker, but hate to use that as I can't wash it and the melted cheese always ended up stuck in the machine. This new toy addresses my previous concerns and I love it so much! The kids love toasted sandwiches with melted cheese. Hubby complained he's getting fat and asked me to stop making him these though I know he loved them too. ;)
I'm ending this long entry with the backlogs of 2010. After my first two log cakes trial, I went on to do a few more. I find Chiffon base to be the best among all the different bases tried. I'll probably stick to that in future.
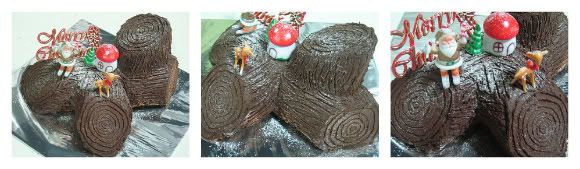
Chocolate logs


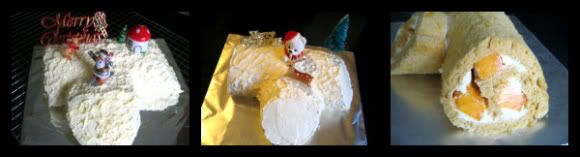
Mango logs
I'm still trying to adjust to the new routine. First week was really chaotic. I didn't even have time to watch my favourite K drama. Stepping into the second week, things seems a little better as the momentum picks up. I need to further adjust my routine, as I do not have much time to sit down and supervise the kids on their work. As a result, the two younger ones are still leading a life of school holiday. :) Darren is going to take his PSLE this year. Having a tutor to take care of three of his subjects, no doubt, is a big relief to me. Sometimes we just need to let go and allow others to help.
This year, I have to pack lunchboxes for the two primary school kids, especially since Olina will only reach home after 2:30pm. So I reckon I'll probably do baking at least once a week, though I'm not sure if I can find as much time to blog them.
I started 2011 with buns. During the Popular 20% member sales, I went to grab a few cookbooks, one of which was "Bread Magic" by Alan Ooi. This has been one of the books I wanted to add on to my collection. I use the basic sweet bun recipe from this book to make these 莲蓉面包.
Packed into lunchbox
The texture is ok, but not as fluffy when eaten on the second day. The next time, I'll try his dough recipe.
I'm now constantly on the lookout for things which can assist me in my lunchbox journey. Unlike my hubby who thinks that it's ok to let the kids bring butter and jam bread, I try to make the lunchbox varies. Recently I found a sandwich maker from Isetan NEX which can be used on the stove. It's a perfect choice for me. I used to have one electrical sandwich maker, but hate to use that as I can't wash it and the melted cheese always ended up stuck in the machine. This new toy addresses my previous concerns and I love it so much! The kids love toasted sandwiches with melted cheese. Hubby complained he's getting fat and asked me to stop making him these though I know he loved them too. ;)
I'm ending this long entry with the backlogs of 2010. After my first two log cakes trial, I went on to do a few more. I find Chiffon base to be the best among all the different bases tried. I'll probably stick to that in future.
Chocolate logs
Mango logs
09 December 2010
Merry Christmas......too early?
Is it a bit too early for Christmas bakes? Well, at least this year I'm not late. :)
I've always been a fan of log cakes when it comes to Christmas food. Hubby said that log cake is just a cake covered in cream in the shape of log. True, but log cakes always has that magic to attract me to take another look at it.
I have never attempted to bake a log cake all these years because I'm really terrible at rolled cakes, especially using the whole egg method. Although egg separation will yield a higher chance of success, I refuse to give in to the idea that rolled cake can only be made by that method. That's some kind of unnecessary stubbornness??
This year I finally decide to attempt it, partly because I saw this baking event - Aspiring Bakers #2: Christmas! (Dec 2010) from Small Small Baker's blog. Seems like a different blogger is taking turn to hold the event each month. This month's event will be held by Passion About Baking. It just gives me some good excuse to bake. *grin*
I did a bit of research on the net regarding log cake. It seems to be commonly named as Bûche de Noël (pardon this mountain tortoise here, but this is the first time I've heard of this term). I'm not sure if there's any difference between this and the conventional swiss roll I'm familiar with. Bûche de Noël does not seem to have any oil in it. The swiss roll recipes that I've been trying contain melted butter. If you know the difference, please let me know.
I've attempted 2 logs so far, both using the cake recipe from Elegant Swiss Roll - Christmas Log by Kevin Chai. It uses only 4 eggs, as compared to some which use as many as 7 eggs! The recipe calls for the whole egg method. I learnt from this video to warm the egg mixture before beating to achieve a greater volume, a good tip indeed. However, I've yet to achieve a good cake texture. I could very well have over mixed when adding the flour and butter.
Presenting to you my 2 Chocolate ganache logs.
The first log...


The inside of the log

The second log...it's starting to snow :)
Oh yes, if you have any tip on how to achieve a smooth edge when carving the lines, please share with me too. I suspect it has got to do with the consistency of the ganache. I always get a rough edge. :(
I've always been a fan of log cakes when it comes to Christmas food. Hubby said that log cake is just a cake covered in cream in the shape of log. True, but log cakes always has that magic to attract me to take another look at it.
I have never attempted to bake a log cake all these years because I'm really terrible at rolled cakes, especially using the whole egg method. Although egg separation will yield a higher chance of success, I refuse to give in to the idea that rolled cake can only be made by that method. That's some kind of unnecessary stubbornness??
This year I finally decide to attempt it, partly because I saw this baking event - Aspiring Bakers #2: Christmas! (Dec 2010) from Small Small Baker's blog. Seems like a different blogger is taking turn to hold the event each month. This month's event will be held by Passion About Baking. It just gives me some good excuse to bake. *grin*
I did a bit of research on the net regarding log cake. It seems to be commonly named as Bûche de Noël (pardon this mountain tortoise here, but this is the first time I've heard of this term). I'm not sure if there's any difference between this and the conventional swiss roll I'm familiar with. Bûche de Noël does not seem to have any oil in it. The swiss roll recipes that I've been trying contain melted butter. If you know the difference, please let me know.
I've attempted 2 logs so far, both using the cake recipe from Elegant Swiss Roll - Christmas Log by Kevin Chai. It uses only 4 eggs, as compared to some which use as many as 7 eggs! The recipe calls for the whole egg method. I learnt from this video to warm the egg mixture before beating to achieve a greater volume, a good tip indeed. However, I've yet to achieve a good cake texture. I could very well have over mixed when adding the flour and butter.
Presenting to you my 2 Chocolate ganache logs.
The first log...
The inside of the log
The second log...it's starting to snow :)
Oh yes, if you have any tip on how to achieve a smooth edge when carving the lines, please share with me too. I suspect it has got to do with the consistency of the ganache. I always get a rough edge. :(
01 December 2010
Hello, Hello Kitty!
This is a long overdue post. This cake was done in late Oct for my little girl's 5th birthday. Time flies, she's already 5 this year! She kept changing her mind on the cake she wanted. It started with a Barbie 3D cake, followed by a Minnie Mouse cake, then a Strawberry Shortcake when she saw one in a store. Finally she decided on a Hello Kitty cake.

The decoration wasn't difficult to do, just need lots of patience and time. I first printed the picture, then trace the outline onto a piece of parchment paper. Place the parchment outline onto chocolate fondant and cut it out. This will serve as the base. Do the same for each individual part and stick them onto the base. Works a little like stenciling.


Complete with a candle and Happy Birthday tag.

happy birthday, dear!

The decoration wasn't difficult to do, just need lots of patience and time. I first printed the picture, then trace the outline onto a piece of parchment paper. Place the parchment outline onto chocolate fondant and cut it out. This will serve as the base. Do the same for each individual part and stick them onto the base. Works a little like stenciling.
Complete with a candle and Happy Birthday tag.
happy birthday, dear!
Subscribe to:
Posts (Atom)
